What is an Email Verifier Pro ?
Bulk Email Verifier Tool allows you to quickly and accurately verify large numbers of email addresses in one go, saving you time and resources. It uses a combination of verification methods, including syntax checking, domain checking, and SMTP validation, to ensure that your email list is accurate and up-to-date. It also helps you to reduce bounce rates and improve the deliverability of your emails.
Descriptions
Bulk Email Verifier Tool allows you to quickly and accurately verify large numbers of email addresses in one go, saving you time and resources. It uses a combination of verification methods, including syntax checking, domain checking, and SMTP validation, to ensure that your email list is accurate and up-to-date. It also helps you to reduce bounce rates and improve the deliverability of your emails.
Features :
- Syntax checking: Check the structure of email addresses to ensure they are valid and properly formatted.
- Domain checking: Verify that the domain of an email address exists and is active.
- SMTP validation: Connect to the mail server to check if the email address actually exists.
- High-speed verification: The tool can process large lists of email addresses quickly, making it ideal for verifying large email lists.
- Real-time validation: Verify email addresses in real-time, so you can be sure that your list is accurate and up-to-date.
- Customizable settings: Allows you to set different parameters for your verification process, such as the number of threads to use, timeout periods, and retry attempts.
- Automatic de-duplication: Remove duplicate email addresses from your list to avoid sending duplicate emails.
- Export and import options: Export the verified email addresses to a CSV or other file format, or import email lists from external sources.
- User-friendly interface: The tool has an easy-to-use interface, making it accessible to users of all skill levels.
- Regular updates: The tool is regularly updated to ensure compatibility with the latest email verification standards and technologies
How to Purchase :
You can purchase this script from Codecanyon : Click Here
Or you can contact us for the script and setup : +918287979402
Let's first Install a control panel to host our email verifier application
Please check out our post how to install a control panel : Click Here
Installation
After Uploading extracted files to “public_html” folder or domain public web folder via FTP, you have to visit install.php file path via the browser to start up the installation process.
File Path For Install.php : yourdomain.com/install.php
Script needs full domain path, do not install on a subfolder. Subdomains (sub.yourdomain.com/install.php) are supported but not subfolders (yourdomain.com/subfolder/install.php). You can replace or use a different home page after installation is completed. However, the script requires a root domain path for a successful installation. Do not forget to replace “yourdomain.com” with your own domain address.
If this is a first-time clean installation and not an update then you will be automatically redirected to install.php once you try to visit your domain. eg: yourdomain.com But if you do not get redirect to install.php then you can simply visit it by the following address: yourdomain.com/install.php
STEP 1 – SYSTEM CHECK
A complete step by step from full server to email verifier script configuration and installation video walkthrough available. Click Here
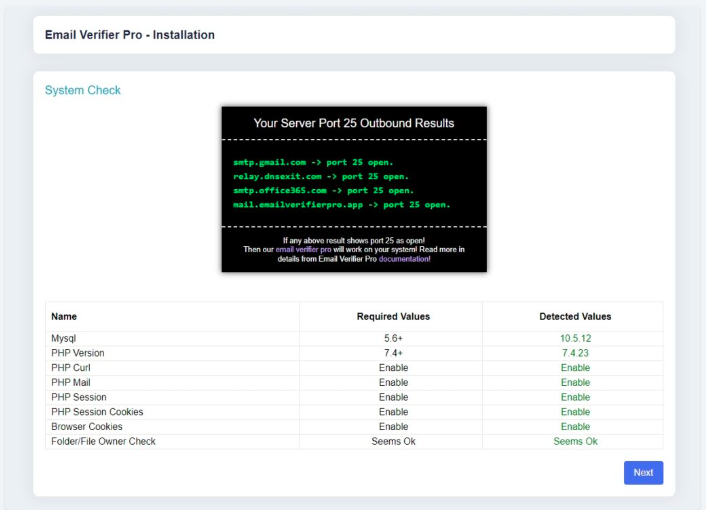
At the very first step of install, it will cross-check existing server compatibility with the script to ensure the highest compatibility. Also, it will do auto check at system detection if your HOST port 25 is open for making outbound connections. If it shows Block. Then don’t bother to install it unless you have an outbound result as Open. Only start installing If you see all SMTP ports 25 open like this above image then you are good to go! If you see something RED then make sure you have it supported and enabled. Please recheck Minimum Requirements support to run this script and make sure it’s all active and enabled on your server & browser before proceeding with the installation. If you see MySQL version check skipped at system check in localhost then not to worry, it will get check during database connection test
STEP 2 – DATABASE CONFIGURATION
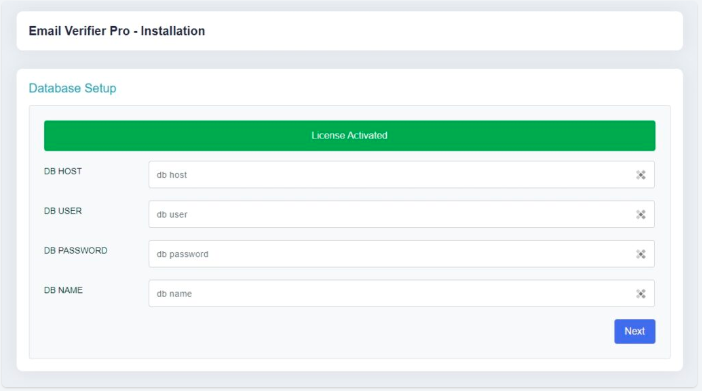
Once everything has been detected correctly and the license activated for your installation domain, press “Next” and proceed to database configuration. Add in your database connection on this page and proceed to “Next” page.
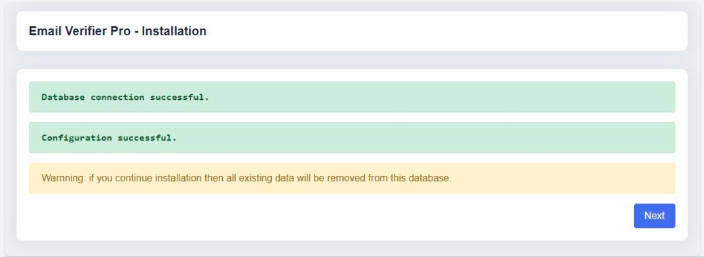
if you receive either of Access denied for user, Connection Fail To Database after pressing “NEXT” during database configuration then you might have old database access information already added in /db/db.cnf.php file. Which makes a conflict with database connection. Make sure your db.cnf.php file is in its original state during installation and you are not adding wrong database information (user, pass, name)
STEP 3 – FINALIZATION
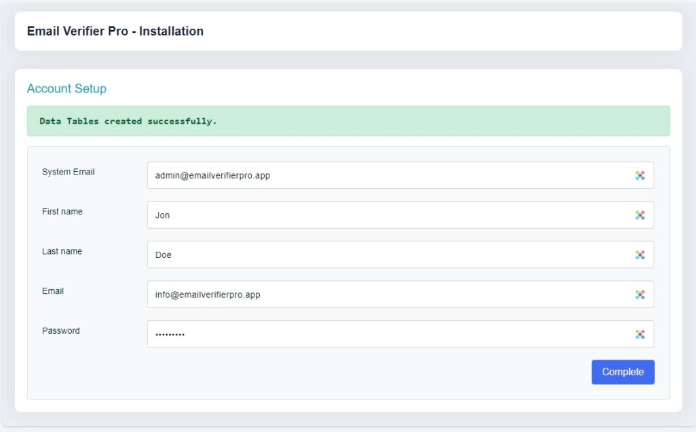
This is the final step to create your login user account. Just simply input in a name, username, email address and password with at least 6 digit and click “Complete”. After this, your installation will be completed and you will be redirected to login page.

After Installation is complete and you are at the login page. Make sure to delete install.php and script zip file from yourdomain.com via web panel / filemanager to keep your installation secured from any attackers or stealing confidential data.
Background – Tasker Cron Job:
Once its done, you have to create a 1 minutes cron job for following file path in your web panel or crontab to activate scan to run in background and check the process always.
* * * * * curl https://your-domain.com/functions/tasker.php?hash=GENERATED_HASH
You can find PHP Binary location through SSH by using command line
whereis php
Also, this
your_php_binary
It is not required at all if you have an easy-to-use web panel like cpanel or our recommended panels. As it adds cron task easily or tells you the formula already.
Warning: Failing to assign tasker crontab may interrupt your scan process from running for longer periods of time if you have not done your server configuration accordingly to this documentation.
Basic Troubleshooting :
Apache
Apache users may increase the default timeout value in the httpd.conf file. For example:
# Timeout: The number of seconds before receives and sends time out.
Timeout 99999
Furthermore, increasing the max_execution_time limit in php.ini can also bring positive results:
max_execution_time = 99999;
Save the changes, restart apache, and re-check. The 504 gateway timeout error should be gone if the cause was insufficient request timeout value.
Nginx + FastCGI (php-fpm enabled):
If your VPS utilizes Nginx, try increasing the following values in /etc/nginx/conf.d/timeout.conf
proxy_connect_timeout 99999;
proxy_send_timeout 99999;
proxy_read_timeout 99999;
send_timeout 99999;
In php.ini set :
max_execution_time = 99999;
Change request_terminate_timeout parameter (commented by default) in /etc/php-fpm.d/www.conf (for Debian /etc/php5/fpm/pool.d/www.conf) file:
request_terminate_timeout = 99999;
Permission Issues :
Login to your server through SSH and locate to the public folder where you have uploaded the script then try out the below commands.
chown -R user:user *
find . -type d -exec chmod 0755 {} \:
